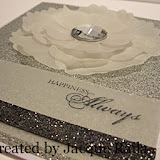
Here is a quick Photo Tutorial, please let me know if you have questions. Begin with an 8 1/2 x 11 cardstock.
 Place the cardstock horizontally (landscape) onto the Score Tool. Score at 1 1/4" and at 3 3/8". Rotate the cardstock (again horizontal) to score the other side at 1 1/4" and 3 3/8".
 Now turn the cardstock to be vertical (portrait) and score at 2 1/8". Rotate the cardstock (again vertical) to score the other side at 2 1/8".
 Place the Diagonal Score Insert on the Score Tool Base. Be sure that you check the bottom for the UP arrow so your Diagonal Plate is correctly aligned on the Score Tool. Place the cardstock horizontally on the Score Tool and score from 5 1/2" to the first cross bar of score lines. FLIP the cardstock over and repeat, scoring from 5 1/2" to the first cross bar of score lines. Rotate the cardstock and repeat for the other side.
Cut along the score lines on each of the sides per the photo to the right. You will cut into the second set of score lines and then cut out the first corner rectangle of each. Now fold and crease each of the score lines, including the diagonal lines. Use your Bone Folder to give them a sharp crease.
 Now to assemble your Box Card. If you want a scalloped edge, such as in the sample at the top of this post, be sure to punch this before adhering the corners of your Box. Try folding your card up without adhesive before you permanently adhere the corners.
 I used Sticky Strip to adhere my Box Card. I like to put the corners wraps to the inside of the Box Card, so that the seam doesn't show, rather than wrapping it around the outside of the card flaps. In this picture, my adhesive is on the WRONG side of the corner and I actually had to take my Box apart and fold it to the other side so that the wrap adheres to the inside of the Box.
Finish your Box Card with stamped images on a Belly Band to keep the Box Card closed. I used a strip of 1 1/4" x 11 inch pattern paper and wrapped it loosely around the Box Card, pinching the score lines on each side. Allow the ends to meet in the front and adhere well to close. Cover this seam with your stamped element. Be sure you leave the Belly Band nice and loose so it will slide off and on without tearing your decorative ends.
I cut a liner of the Naturals Ivory cardstock at 4 1/8 x 4 1/8 to put on the inside of the Box. Don't adhere this liner to the inside of the box, so that you can remove it to write a note. For our Box Cards, we created a set of simple gift tags and put them inside. Other items you could include in this Box Card are a simple chain and charm, a gift card or set of photos.


My Stampin' Events
Current Stampin' Up! Promotions
Mary Rindal is an Independent Stampin' Up! Demonstrator in Greenwood Village, Colorado.


2 comments:
I'm trying to make the box card and I'll be darned if I can figure out what gets adhered to what. My score lines and folds seem ok. I cut the four corners off entirely. Was that the right thing to do?
Cut off the outer most corners completely to reduce the bulk. Then be sure to cut into the next score line to create the flaps. Then you should be able to see the box. If you look at the photo above with the corners cut, you can see the cut lines on the bottom of the card. You'll want to do that on all four corners. Let me know if that helps.
Post a Comment