Tuesday, November 29, 2011

Dyed Glimmer Paper Snowflakes - a Christmas Card

I am so in love with the Glimmer Paper from Stampin' Up! I tried several methods for dying the Silver Glimmer Paper and then created a bunch of beautiful snowflakes with the Northern Frost Decorative Strip Die for these Christmas cards. I saw this card on Melissa Davies blog and swooned! So I had to make a whole bunch of these beauties! I added three score lines under the Peace on Earth sentiment with my Simply Scored Scoring Tool. You really have to see this in person to see how amazing and sparkly this paper is

These snowflakes are SO glittery in person, you have to see them! I colored some with Night of Navy ink and others with Elegant Eggplant ink and left a few Silver. For the inside, I stamped one of the snowflakes from Serene Snowflakes in Elegant Eggplant ink and then rolled the edges in Night of Navy ink before stamping. This beautiful stamped snowflake worked well with the beautiful glittery snowflake on the card front.


My Stampin' Events
Current Stampin' Up! Promotions


Mary Rindal is an Independent Stampin' Up! Demonstrator in Greenwood Village, Colorado.

Sunday, November 27, 2011

HO HO HO card with Glimmer Paper

Well, last week I shared with you some pictures of the results after trying different ways to dye the Silver Glimmer Paper and some pictures of my ink stained fingers - which come clean pretty quickly washing dishes, but the fingernails - that's a different story! Today, I want to share one of the cards I made with the gorgeous Glimmer Paper. The sparkle on this paper is really amazing and I love using it! I colored a few pieces with Real Red Re-inker and then ran them through the Big Shot with the Timeless Type Junior Alphabet.

I also used my Simply Scored Scoring Tool to add a little off balance frame to the Whisper White cardstock here. Then I added the HO HO HO with Stampin' Dimensionals. The right side of the card is cut a little short and embossed with the Petals A Plenty Folder to add an area of poinsetties. Finally I punched a strip of Basic Black with the Scallop Trim Border Punch and and adhered it to the inside of the front of the card for this peek-a-boo border.


My Stampin' Events
Current Stampin' Up! Promotions


Mary Rindal is an Independent Stampin' Up! Demonstrator in Greenwood Village, Colorado.

Friday, November 25, 2011

Silver Glimmer Paper and Inky Fingers

 I hope you had a wonderful and relaxing Thanksgiving! We had a restful holiday, but back to sports and practices and games today! I played with some ink and Silver Glimmer Paper and look what a mess I made! But I had so much fun and I really do love the Silver Glimmer Paper! But why didn't I order this beautiful paper sooner and WHY didn't I open this package as soon as it arrived! We'll be playing with the Silver Glimmer Paper at December Technique Club.


Here are some of the pieces I started with. The Silver Glimmer Paper is AMAZINGLY sparkly - you can't imagine it until you have it in hand. I decided to color mine with Night of Navy and then Elegant Eggplant re-inkers. I tried a few different ways to color it, including the Brayer - fail, a Sponge - notice fingers, an AquaPainter - too slow, and finally a Sponge Dauber - yes! I didn't try a Marker because I think the glitter on the paper would be hard on the Marker tip. My daughter colored a few pieces with Tempting Turquoise and Real Red. I put the Real Red ones to use right away. There's a big hint in this picture! I'm not sure what she has planned with the Turquoise piece.

If you want to see the cards I made with the Real Red glimmer and with all these Night of Navy and Elegant Eggplant glimmer pieces, you'll have to check in next week. I can't wait to share the cards with you - they're simple and elegant and sparkly and they make me happy! As for the Silver Glimmer Paper - you should definitely get some for yourself! Stampin' Up! offers it in Silver and Real Red.


My Stampin' Events
Current Stampin' Up! Promotions


Mary Rindal is an Independent Stampin' Up! Demonstrator in Greenwood Village, Colorado.

Wednesday, November 23, 2011

Kraft Gift Boxes with Spice Cake Designer Series Paper

Congratulations to Jacque, winner of my November Customer Appreciation Giveaway!

I worked on a little project today and was so happy when it came together quick and easy! I decorated the 
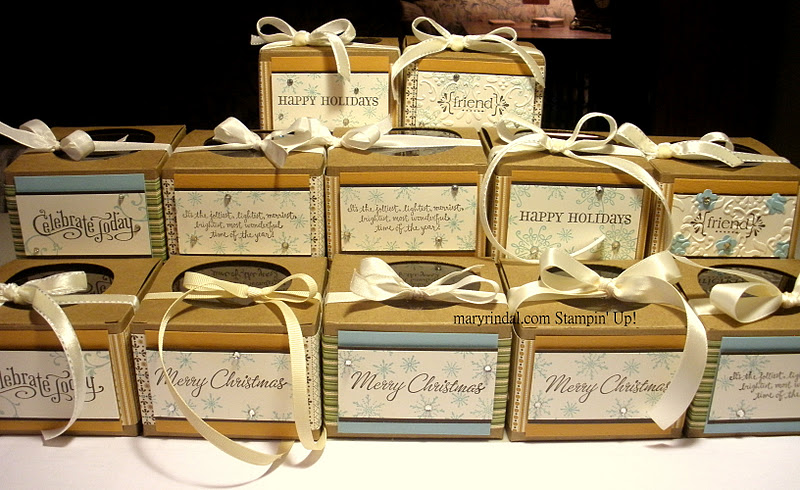
Stampin' Up! Kraft Gift Boxes from the Holiday Mini Catalog. These are packages of 4 for only $2.95 and from food safe material. I made these 12 gift boxes in no time and they're so pretty! They made me happy! Don't you love that happy dance when you finish a project? Can you guess what will be going in them?

Here's a closer look at a few of them. I made some 'friends' with the stamp from With All My Heart and another from Perfectly Penned, a few others with the fun and whimsical sentiment from Jolliest Time of Year stamp set, and several with sentiments from Four the Holidays.The snowflakes are from Serene Snowflakes. I used a variety of Vanilla Ribbons including the Very Vanilla Velvet Ribbon from the Holiday Mini Catalog which I just love, 5/8" Very Vanilla Satin Ribbon, Very Vanilla 3/8" Taffeta Ribbon and 1/4" Very Vanilla Grosgrain Ribbon.


My favorite part is the lid - can you see it here? I punched a circle in the lid with the 2 1/2" Circle Punch. Then I adhered a 3x3 square of Window Sheet on the inside of the lid with a Mini Glue Dot in each corner. Can you see the reflection of the Window Sheet in the lid cut-out?

I used the beautiful papers from Spice Cake Designer Series Paper to wrap all of these. That led to color combination -  More Mustard mats, Very Vanilla cardstock and ribbon and Early Espresso and Pool Party ink colors. I added a touch of sparkle with several Rhinestone Jewels scattered here and there on the snowflakes and flourishes.

My daughter said her favorites were the ones that I stamped first and then added more texture by running the piece through the Big Shot with a Textured Embossing Folder - I used Vintage Wallpaper and Finial Press on a few pieces.

And what will be going into these pretty little Gift Boxes? Cookies! My Technique Club ladies are having our [annual] Cookie Swap and we need to bring our cookies already packaged in sets of six. Just the perfect number for these Kraft Gift Boxes! I am going to print out the recipe for my cookies and tie it on as a Gift Tag to the Ribbon Bows for the finish. I can't wait for December Technique Club!


 Recipe:
Stamps: Four the Holidays, With all my Heart, Serene Snowflakes, Jolliest  Time of the Year, Perfectly Penned
Cardstock: Spice Cake DSP, More Mustard, Pool Party, Early Espresso, Very Vanilla
Ink: Early Espresso, Pool Party
Accessories: Kraft Gift Boxes, Vanilla Ribbon - Velvet, Taffeta, Grosgrain and Wide Satin, Rhinestone Basic Jewels, Finial Press and Vintage Wallpaper Texture Embossing Folders


My Stampin' Events
Current Stampin' Up! Promotions


Mary Rindal is an Independent Stampin' Up! Demonstrator in Greenwood Village, Colorado.

Monday, November 21, 2011

Stampin' Up! Online Extravaganza


Be sure to check out the Online Extravaganza, the annual sale from Stampin' Up! to kick off the holiday shopping season! Including the two items that are for 24 hours only - The Simply Scored tool and the Sweet Pressed Cookie Stamps both at 20% off! The other great sale prices will run through Wednesday, November 30, 2011. Log in to my Online Store to take advantage of great savings, like FREE digital downloads valued at $40 when you buy My Digital Studio Express, 60 percent off select Designer Fabrics, and 30 percent off an exclusive Ribbon bundle!


My Stampin' Events
Current Stampin' Up! Promotions


Mary Rindal is an Independent Stampin' Up! Demonstrator in Greenwood Village, Colorado.

Wednesday, November 16, 2011

Split Negative Embossing Technique - Always Thankful

Here's a Technique that is fun to make and looks amazing, it's called Split Negative Embossing - a Heat Embossing Technique. I stamped this one with the bushel of pears basket from Always Thankful, a set from the Stampin' Up! Holiday Mini Catalog.

This is one of the cards we made at November Technique Club and I think most of the ladies were surprised at how easy it really is. To create the Split Negative, cut a piece of Basic Black and Whisper White cardstock to the same size and then wipe with the Embossing Buddy. I always recommend using the Embossing Buddy when you are doing high contrast embossing - it helps prevent all those stray pieces of embossing powder. Then place the Basic Black and Whisper White butted up to each other on Grid Paper or whatever you use for your stamping surface. Stamp the image in VersaMark ink onto the two pieces of cardstock. Cover the Basic Black piece in White Embossing Powder and heat to set. Cover the Whisper White piece in Black Embossing Powder and heat to set. Then put them back to together! I like to mat them onto a contrasting mat to emphasize the technique.

Recipe:
Stamps: Always Thankful, En Francais
Ink: VersaMark, Jet Black StazOn
Cardstock: Whisper White, Basic Black
Accessories: White and Black Embossing Powder


My Stampin' Events
Current Stampin' Up! Promotions


Mary Rindal is an Independent Stampin' Up! Demonstrator in Greenwood Village, Colorado.

Friday, November 11, 2011

Scrap64 Theme - Homecoming Page

The November Scrap Theme Challenge is CARD CANDY. Use a card that you've stamped or one from someone else to inspire you for scrapbooking this week. Create a Scrapbook Page using card elements (CARD CANDY) or CASE a card for your page design. My page uses CASED pieces from the Elements Suite card samples on page 125 in the Idea Book & Catalog. Scrapbook page design can be overwhelming, including the SIZE of the canvas. Use a greeting card that you've stamped or copy a card that someone else stamped and incorporate into your Scrapbook Page - as an element, color scheme or design layout. Share the cased card with us and tell us what elements inspired your scrapbook page.

I used the samples on page 125 as inspiration in Sahara Sand, Elegant Eggplant and Soft Suede. I CASED the Scallop Circle Embellishment from one of these cards and used the design idea of a ruffled ribbon and tag for a portion of my title.  I ran the First Edition Designer Series Paper through my Big Shot with the Scallop Circle Die and then stamped on it with images from the Extreme Elements stamp set in Soft Suede. I ran a piece of Very Vanilla cardstock through the Big Shot with one of the Designer Frames Embossing Folders and then cut it out along the outside of the embossed frame. I stamped on this piece and then lightly sponged the outside of the framed with a Sponge Dauber and Soft Suede ink. This is layered up with Chantilly Crochet Trim and Wisteria Wonder Ruffled Ribbon, a Vintage Mini Tag, Vintage Trinket Button Brad, Antique Brad and some Basic Pearls and flowers from the Itty Bitty Punches.


I even added a journaling block to this page, as small as it is, instead of free handing writing around the photos. The title on this page is stamped using two different Stampin' Up! alphabets, Monogram Sweet Alphabet and Spencerian Alphabet Lower. This is stamped in Soft Suede ink on a strip of Very Vanilla cardstock and I free hand cut the banner tips. I layered the banner over a piece of Soft Suede cardstock which is embossed with the Vintage Wallpaper Embossing Folder. The 2011 portion of the title is cut with the Timeless Type Alphabet for the Big Shot and then embossed with the Vintage Wallpaper Embossing Folder and lightly sponged.

Recipe:
Stamps: Thoughts and Prayers, Extreme Elements, Monogram Sweet Alphabet, Spencerian Alphabet Lower, Tiny Tags
Cardstock: Sahara Sand, Soft Suede, Elegant Eggplant, Very Vanilla, First Edition DSP
Ink: Soft Suede, Elegant Eggplant
Accessories: Scallop Circle Die, Scallop Square Die, Timeless Type Junior Alphabet (Big Shot), Designer Frames and Vintage Wallpaper Textured Impressions Embossing Folders, Decorative Label Punch, Itty Bitty Punches, Cutter Kit, Chantilly Crochet Trim, Wisteria Wonder Ruffled Ribbon, Antique Brads, Mini Vintage Tags, Vintage Trinkets, Basic Pearls


My Stampin' Events
Current Stampin' Up! Promotions


Mary Rindal is an Independent Stampin' Up! Demonstrator in Greenwood Village, Colorado.

Stampin' Up! Promotions

 Get a free Big Shot (or $100 your choice Stampin' Up!) when you join the Stampin' Up family by November 11th. Download the Starter Kit Worksheet This is what you get in the Starter Kit, and what can be changed out to suit your tastes in stamp images and colors. It's a great worksheet for your choices, so when you sign up online at mjrindal.stampinup.net, it will only take about ten minutes to get the Starter Kit ordered and on it's way to you!
The Starter Kit is a great deal at $175 for over $350 worth of products, but when you add on a $100 bonus like that, it becomes irresistible! Call me today and we can go over the details and answer any questions you have, but there really is no downside to this. Stampin' Up makes it easy and fun to do it as a hobby or for a business, with just a $300 quarterly minimum to stay active, and if it ends up not being for you, you don't have any obligations. There are no required number of parties to hold, and no one will try to pressure you into selling or staying.

It's Good to be a Hostess gives you the opportunity earn an additional $35 in free merchandise when you host a workshop. This can be a catalog or home party at your house or mine and when your sales reach $350, you earn the $35 free merchandise in additional to the free hostess merchandise! Click on the photo to the left for more details.


My Stampin' Events
Current Stampin' Up! Promotions


Mary Rindal is an Independent Stampin' Up! Demonstrator in Greenwood Village, Colorado.

Wednesday, November 9, 2011

Birthday Card - Many Mustaches

Here is a fun birthday card with a sweet treat attached to it, featuring the Many Mustaches stamp set from Stampin' Up! The Pixie Stick candy has a mustache attached with a glue dot to the top and is tied to the card front to be removed by the recipient. The Many Mustaches stamp set is a single stamp with four different fun and funny mustaches on a single block. I cut mine apart and mounted them individually on the block to make it easier to use them separately. You can find this quirky stamp set at the front of the catalog with the a la carte stamps.


Recipe:
Stamps: Happiest Birthday Wishes, Many Mustaches
Ink: Tempting Turquoise, Jet Black StazOn
Cardstock: Brights Paper Stack, Tempting Turquoise, Whisper White
Accessories: Scallop Border Punch, Whisper White Taffeta Ribbon, Extra Large Oval Punch


My Stampin' Events
Current Stampin' Up! Promotions


Mary Rindal is an Independent Stampin' Up! Demonstrator in Greenwood Village, Colorado.

Sunday, November 6, 2011

Christmas Card - Sparkling Dasher

How are your Christmas cards coming along? Here's a beautiful Christmas card that's easy to duplicate and has just the right amount of sparkle with the gorgeous Dasher stamp from Stampin' Up! and the new Holiday Mini Catalog set, The Sounding Joy. These Mini Jingle Bells are also from the Holiday Mini Catalog.

I embossed the Whisper White background  in the Big Shot with the Northern Flurry Textured Impressions Embossing Folder. The Dasher image is stamped in Basic Black Craft Ink and then heat embossed with Iridescent Ice Embossing Powder. I wasn't able to capture that bit of sparkle and glint with my camera though.

I stamped the JOY sentiment, with its beautiful scroll font, in Cherry Cobbler ink onto the Whisper White background and then wrapped this with some Cherry Cobbler Seam Binding. The Mini Jingle Bell is tied on with a loop of Cherry Cobbler Baker's Twine.


Recipe:
Stamps: Dasher, The Sounding Joy
Inks: Basic Black Craft, Cherry Cobbler
Cardstock: Basic Black, Cherry Cobbler
Accessories: Cherry Cobbler Seam Binding, Cherry Cobbler Baker's Twine, Mini Jingle Bell, Ticket Corner Punch, Northern Flurry Texture Folder


My Stampin' Events
Current Stampin' Up! Promotions


Mary Rindal is an Independent Stampin' Up! Demonstrator in Greenwood Village, Colorado.

Thursday, November 3, 2011

Blooming with Happiness - Swap Card

This card is another swap card from one of the Technique Club members, Megan. She used the Blooming with Happiness stamp set from Stampin' Up! Another beautiful swap card - see why we love swapping with each other every month?!


My Stampin' Events
Current Stampin' Up! Promotions


Mary Rindal is an Independent Stampin' Up! Demonstrator in Greenwood Village, Colorado.

Wednesday, November 2, 2011

More swaps - Long Time Friend

Here are some more swaps from my Technique Club ladies - both of these were created by Jacque. The first card uses Long Time Friend stamp set and the second card features a Magnolia stamp. Doesn't she do a beautiful job coloring?! These are a talented group of ladies and I love stamping with them every month!


My Stampin' Events
Current Stampin' Up! Promotions


Mary Rindal is an Independent Stampin' Up! Demonstrator in Greenwood Village, Colorado.
Related Posts with Thumbnails