Friday, February 26, 2010

Vintage Vogue - Tea Party Friends

stampin up, vintage vogueAt the Stampin' Up! Regionals event in Fort Collins, all attendees received the Vintage Vogue stamp set and we had several make-n-takes using it. I had already purchased Vintage Vogue, as it caught my eye right away! Here are a couple of swap cards I made using Vintage Vogue with the Tea Party DSP in some spring colors.

This layout is one I go to often for some reason. I like the strips of pattern paper offsetting the balance of the card I guess. I distressed all the layers of this card and even tore and rolled the So Saffron mat to reveal some of the card front underneath. I also added some sponging to the main stamped panel. And I am so in love with our Satin Ribbon - the Certainly Celery here.

stampin up, vintage vogue{Inside}
Recipe:
Stamps: Vintage Vogue
Cardstock: Lavender Lace, So Saffron, Whisper White,Tea Party DSP
Ink: Regal Rose, Lavender Lace
Accessories: Certainly Celery Satin Ribbon, Cutter Kit, Mat Pack and Paper Piercer


stampin up, vintage vogue, handmade cardA horizontal version with fewer layers and no distressing.

Fabric Project for the Big Shot

Ponytail Holder

Stamps

  • None

Paper

  • None

Ink

  • None

Accessories

  • Corduroy button
  • Sizzix Big Shot
  • Scallop Circle #2 Bigz die
  • Fabric
  • Needle and thread
  • Ponytail elastic

Instructions
  1. Die cut 10 large scallop circles using Big Shot and Scallop Circles #2 Bigz die. Cut off eight of the scallops from each scallop circle. Gather together across the flat side about 1/4" from edge, gathering all ten circles on the same double-thread. Tie off.
  2. Die cut 10 small scallop circles using Big Shot and Scallop Circles #2 Bigz die. Gather the circles across three of the scallops on the same double-thread. Tie off.
  3. To cover Corduroy button, die cut a small scallop circle, then cut off all scallops. Gather the fabric around the edge, place button in the middle, then gather up threads and tie off.
  4. Attach ponytail elastic to back, then sew through all layers of fabric (including fabric around button), so fabric layers are connected to elastic.
Stampin' Up! © 2010

Thursday, February 25, 2010

Birthday Favors - a closer look II

stampin up, sweet pea paper stack, sale-A-bration, photo frame, birthday favorsHere's a closer look at some more of the Birthday Favors I created last weekend for the Stampin' Addicts Birthday Blog Hop and some tips to make them. Again, I used the Sweet Pea Paper Stack from the Stampin' Up! Occasions Mini Catalog for all my Birthday Favors. For this ensemble, I just used the greens and blues, instead of the oranges and pinks.


Both of these Birthday Favor sets include several items from the Sale-A-Bration Mini Catalog and the Occasions Mini Catalog. Can you list all the FREE Sale-A-Bration items from these Birthday Favors and the previous Birthday Favors?


This party theme is based on an Amusement Park visit, so, of course, we had to have Bag Tags. These personalized Bag Tags are something the kids could stamp themselves as an activity, or you can make quickly and easily before the party. I used the plastic Badge Holders that you can find at any office supply store. I cut a piece of Old Olive cardstock to fit inside the Badge Holder and then added some layers of cardstock and pattern paper. To personalize the Bag Tags I stamped a monogram using the Lovely Letters alphabet. These are tied to the girls' bags with a piece of Ribbon.


TIP: Use the flame from a lighter to just barely melt the ends of your cut ribbon to prevent unsightly fraying, especially where the ribbon will be well used, such as on these Bag Tags.
Recipe:
Stamps: Lovely Letters, Friends Rock,
Cardstock: Old Olive, Crushed Curry, Bermuda Bay, Whisper White, Sweet Pea DSP
Ink: Bermuda Bay
Accessories: Crushed Curry Polka Dot Ribbon, Perfect Polka Dots Texture Folder for the Big Shot, 1 1/4" Circle and 1 3/8" Circle Punches


Another quick and easy Birthday Favor uses the Sweet Treat Cups from Stampin' Up! I just included some M&M's in matching colors. This is layered with some more paper from the Sweet Pea Paper Stack and tied off with ribbon. The sentiment is from Teeny Tiny Wishes and is adhered to the Treat Cup with Mini Glue Dots.

TIP: Don't forget the 1 3/4" Circle Punch to create the mats for the Sweet Treat Cups. I just cut a little 'X' on the back of this Sweet Treat with my Hobby Blade so that it was easy for the kids to get their candies out.

Recipe:
Stamps: Teeny Tiny Wishes
Cardstock: Old Olive, Bermuda Bay, Whisper White, Sweet Pea DSP
Ink: Bermuda Bay
Accessories: Sweet Treat Cups, 1 3/4" Circle Punch, Crushed Curry Polka Dot Ribbon, Word Window Punch, Modern Label Punch


This Photo Frame is really quick and easy to make, too (seeing a theme here?!) I used a piece of 5"x12" Old Olive cardstock, scored at 1", 6" and 11". Fold on all the score lines and adhere the bottom and top tabs to a 2"x5" piece of Old Olive cardstock to give the photo frame a wide base. I added a mat of Sweet Pea DSP. The Bermuda Bay photo mat is run through the Big Shot with the Scallop Square Die and adhered with Stampin' Dimensionals. The mat accommodates a 4x4 photo, so you can easily crop a 4x6 photo down to fit the Photo Frame and send home with the party goers.

Recipe:
Stamps: Oval All
Cardstock: Old Olive, Bermuda Bay, Whisper White, Sweet Pea DSP
Ink: Bermuda Bay, Crushed Curry marker
Accessories: Crushed Curry Polka Dot Ribbon, Scallop Square Die for the Big Shot, Large Oval and Scallop Oval Punches, Stampin' Dimensionals, Mini Glue Dots


TIP: If you're struggling with the ribbon bow, just wrap a piece of ribbon around your project and adhere it down. Then take a piece of ribbon and create two 'bunny ears', one in each hand. Tie these bunny ears around each other once to create a bow. Fluff the bow and arrange the center knot as needed. Attach to your ribbon wrap with a Mini Glue Dot.

Wednesday, February 24, 2010

Birthday Favors - a closer look

stampin up, birthday favors, matchbook card, sale-a-bration, sweet pea paper stackLast weekend I was part of the Stampin' Addicts Birthday Blog Hop to celebrate the First Birthday of the Stampin' Addicts website. StampinAddicts.com is a free website dedicated to supporting Stampin' Up! stampers and demonstrators alike. Their motto is "Positively Creative! Positively Stampin' Up!". They welcome all crafters and only ask that you maintain a positive outlook and most importantly HAVE FUN... Oh, and you're sure to make some great new friends there as well!

This month Stampin' Addicts is celebrating their First Birthday with some fun contests, so be sure to stop by their Forums and participate in the contests and don't miss all the stampin' inspiration in the Gallery as well! And give me a shout out if you're there - MaryR.

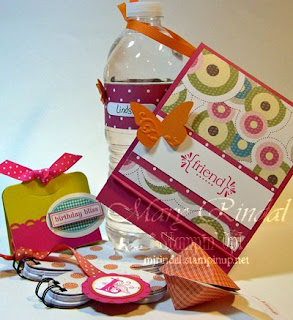
Here's a closer look at some of the Birthday Favors I created last weekend and some tips to make them. Use Stampin' Up! Designer Series Paper to carry your Party Theme throughout the decorations and favors - I used the Sweet Pea Paper Stack from the Stampin' Up! Occasions Mini Catalog for all my Birthday Favors. I love the coordinating colors and patterns.

My favorite favor in this ensemble is probably the Matchbook Treat. This is an easy card to create and it accommodates just a note or bulkier items like the candy and drink mix here. Start with an 11" x 4 1/4" piece of cardstock, just as you would for a regular A2 sized card. Score it at 1" and again at 6 1/2" to create the Matchbook fold. I stapled the bottom fold three times, once in the middle and then on each side. The front flap tucks into this fold area.

Roll the top of the bottom portion fold back onto itself to create a little lip. I use the tip of my Paper Piercer to help get a tight roll. Decorate the front of the Matchbook Card, remembering that the lower edge will be tucked into the bottom fold, so work with that margin as you decorate. My Matchbook Treat included a drink mix, so I punched a hole on the back of the card and tied a ribbon to it to hang off the water bottle.

Recipe:
Stamps: With All My Heart
Cardstock: Melon Mambo, Whisper White, Pumpkin Pie, Sweet Pea DSP
Ink: Melon Mambo
Accessories: Beautiful Wings Embosslit, Pumpkin Pie 1/4" Grosgrain Ribbon


TIP: Wrap a narrow strip of pattern paper around the drink bottles to instantly coordinate with your party theme. Add a Word Window punch to this wrap and you have ID's for each drink, too. This works for adult parties as well as children's parties.

I added a tiny butterfly from the Beautiful Wings Embosslit to the water bottle, too. I just love this set of butterflies and have to resist adding them to every project! But it does tie in the decor from the Matchbook Treat right over to the Water Bottle.

This Chapstick Holder is a fun way to add another Party Favor, whether you add a tube of Chapstick Tube inside it, or just a few pieces of chocolate - Hershey Nuggets fit well. I cut two pieces of Crushed Curry cardstock with the wider tag on the Two Tags die for the Big Shot. For the tubes of chapstick, I lined up the score line on the tags at the 1" mark on my Paper Cutter and cut off the bottom of both tags. Fold on the score lines and glue the bottoms of the two tags together to create the triangle treat holder. Decorate the front and add a Mini Glue Dot to the tube of Chapstick to keep it in place. Tie closed with a piece of Ribbon.

TIP: When creating 3D items, be sure to use a strong adhesive such as Sticky Strip or Tombow Mono Multi Glue.


Recipe:
Stamps: Birthday Bliss
Cardstock: Crushed Curry, Melon Mambo, Whisper White
Ink: Bermuda Bay, Melon Mambo
Accessories: Two Tags Die for the Big Shot, Wide Oval Punch, Scallop Trim Border Punch, Melon Mambo Polka Dot Ribbon


These little Fortune Cookie favors are super quick and easy to make. Cut several circles from pattern paper - I used the Circle Die for the Big Shot to make several at once. Fold the circle in half and make a light crease along the fold line. Open this and then fold in the opposite direction, again make a light crease along the fold line. Put a Mini Glue Dot in the outside center to attach the edges of the circle here. Use your finger to push the crease line open and bring the outside edges together. Use another Mini Glue Dot to attach the tips together about 1/2" from the edge. Stamp your sentiments on a narrow strip of Whisper White cardstock and then add a banner tip with the My Way Punch. Adhere to the inside of the Fortune Cookie with a Mini Glue Dot.


Actually, this little Flower Notebook may be my favorite treat from this ensemble! Again, this is a quick and easy item to make - a must have for Birthday Favors, right?! Big Shot to the rescue - I used the Flower Die for the Big Shot to cut several pieces of copy paper for the inside pages of this notebook. Then I adhered a piece of the pattern paper to a piece of the light weight chipboard backing that comes in the Designer Series Paper packs. I ran this through the Big Shot with the same Flower Die. I used a Bind It All here, but a Binder Ring clip would work just as well and the Crop-A-Dile will hole punch through all these layers. I stamped a little Page Marker with each girl's initial and attached that to a piece of ribbon tied to the binding.


Recipe:
Stamps: Friends Rock, Lovely Letters
Cardstock: Melon Mambo, Dusty Durango, Whisper White, Sweet Pea DSP
Ink: Dusty Durango, Melon Mambo
Accessories: Flower Die for the Big Shot, Dusty Durango Polka Dot Ribbon, Scallop Circle, 1 3/8 Circle and 1 1/4" Circle Punches, Bind It All

Tuesday, February 23, 2010

Flip Flop Heart - Vintage Vogue

stampin up, big shot, flip flop cardHere is one of the cards we made this month at my Stamp Camps. I call it a flip flop heart card, and it uses the Stampin' Up! set Vintage Vogue as well as the Movers & Shapers Die for the Big Shot. It's really a quick and easy card, but a fun and unique fold for something a little different. This card is stamped for an all occasion card to give to a friend, however, with a changed sentiment, easy to do with the Teeny Tiny Wishes stamp set, this is also a beautiful sympathy card.

stampin up, big shot, flip flop card


stampin up{Inside}
Recipe:
Stamps: Vintage Vogue, Teeny Tiny Wishes
Cardstock: Cameo Coral, Very Vanilla, Chocolate Chip
Ink: Chocolate Chip, Cameo Coral
Accessories: Big Shot Movers & Shapers Die, Punch Windows Dies, Very Vanilla Taffeta Ribbon, Full Heart Punch, Sponge Daubers


Monday, February 22, 2010

50th Birthday Card- Nouveau chic

stampin up, birthday card, 50th birthday, Big ShotThis is a card I designed for a customer's specific request. She wanted a 50th birthday card for her brother who is a DJ at a local radio station. I like the Nouveau Chic Designer Series Paper from Stampin' Up for neutral, monochromatic cards, so that's where I started. I saw a Vinyl Record depicted on an Extreme Guitarist card by Jacki Topa and that gave me the idea for that element.

I layered pieces of the Nouveau Chic DSP onto mats of Whisper White that were distressed with the Cutter Kit. These are layered onto the Basic Black card base to create the background for this card. I pushed a Jumbo White Grommet into a 1 1/4" Circle Punch of Basic Black to represent a record and then layered a 'You Rock!' banner under that. The you rock sentiment is from the Just Jawin' stamp set. This is embossed with Basic Black Craft Ink and Clear Embossing Powder to give it some shine and dimension. I tucked it under a knotted Basic Black Satin Ribbon.

The '50' is die cut from another piece of the Nouveau Chic DSP using the Timeless Type dies for the Big Shot. I layered it onto a Wide Oval Punch of Basic Black and put Pewter Brads over 1/4" Circle mats of Whisper White to ground it.

TIP: To set the Jumbo Grommet, lay your piece of cardstock onto the foam mat from the Mat Pack (or use the back of a mouse pad.) Then place your Grommet onto the cardstock where you'd like it set and press firmly to push the Grommet legs through the cardstock into the foam. Remove the piece from the foam mat and turn it face down onto a firm surface. Use the top of your Paper Piercer or the top of your Bone Folder to bend the Grommet legs back.

stampin up, birthday card{Inside}
Recipe:
Stamps: Just Jawing, Kind Thoughts
Cardstock: Basic Black, Whisper White, Nouveau Chic DSP
Ink: Basic Black Craft
Accessories: Timeless Type Dies, Basic Gray Satin Ribbon, Jumbo Grommets, Vintage Brads, Cutter Kit, 1 1/4" Circle Punch, 1/4" Circle Punch, My Way Punch, Clear Embossing Powder, Stampin' Dimensionals

Saturday, February 20, 2010

Stampin' Addicts Birthday Blog Hop!

stampin addicts, blog hopWelcome to the Stampin' Addicts Birthday Blog Hop weekend! StampinAddicts.com is a free website dedicated to supporting Stampin' Up! stampers and demonstrators alike. Our motto is "Positively Creative! Positively Stampin' Up!" If you have not been to Stampin' Addicts, you should check them out as soon as you finish the Birthday Blog Hop! And be sure to give me a shout out - I'd love to see you there! My screen name is MaryR and I happen to know that there will be a STAMP JAM going on this weekend at Stampin' Addicts with Challenges and Stampin' and lots of Inspiration!


You may have arrived at my blog from Rubber Stampin and Card Making with Yapha (Click on her blog name to go back to her blog.) where she showcased some young girl birthday ideas. Remember, some of the blogs may not have their Birthday Blog Hop posts posted yet - I am getting mine up a little early.

How about a collection of Birthday Party Favors? It's so easy to coordinate some of the Stampin' Up! Designer Series Paper with cardstock and inks to match. Here are two sets of Party Favors that would work for either a girl or boy birthday party.

stampin up, stampin addicts, blog hop, birthday party, birthday favorsFor this set, I wrapped a water bottle with a strip of pattern paper from the Sweet Pea Paper Stack and added a Word Window Punch of Whisper White to write the party girl's name - so she knows which bottle is hers all afternoon! A little butterfly from the Beautiful Wings Embosslit is added, too. Hanging on the water bottle is a Matchbook Treat, also made from the Sweet Pea DSP and embellished with another of the butterflies from the Beautiful Wings Embosslit. The Birthday Bliss favor is a little Chapstick Holder, made from the Two Tags Die for the Big Shot. Do you recognize the Sale-A-Bration items used here, too?


I tucked a fun sized bag of M&M's and a Kool-Aid single pack inside the Matchbook Treat.


stampin up, big shot, flower die, notebook, stampin addicts, blog hopThe party goers can stamp their own little Flower Notebook and Fortune Cookies as part of the birthday party activities, or you can easily make these ahead of time, too. The notebook is made from the Flower Die for the Big Shot with a monogrammed page marker to identify each girls' book.


stampin up, stampin addicts, blog hop, birthday party favorsThis set of Party Favors includes a Photo Stand, again using some of the papers from the Sweet Pea Paper Stack. I created the stand from a piece of Old Olive cardstock, layered with a piece of Sweet Pea DSP. The top layer is a piece of Bermuda Bay cardstock cut with the Scallop Square Die for the Big Shot. The frame accommodates a 4x4 photo. My kids love anything personalized for them, so I included a Bag Tag, monogrammed on one side and stamped on the other, inside a badge holder pocket. I also used a Sweet Treat Cup and created a Sweet Treat Favor of M&M's candies that coordinated with the party colors.


Next week on my blog, I'll have more details on some of the Party Favors featured here, including the Flower Notebook, along with some tips and tricks for these projects.


stampin addicts, blog hopNow you are on your way to the next Stampin' Addicts Birthday Blog Hop at Heartfelt Inkspiration where Deb's theme is Birthday for a Gardener! (Click on her blog name to continue on the blog hop.)


Thanks for stopping by! See you over at Stampin' Addicts!


Friday, February 19, 2010

Vintage Vogue Color challenge

stampin up, vintage vogue, color challengeFor Sharon's Color Challenge 42 at Stampin' Addicts to use Kraft, Old Olive, Melon Mambo and Crushed Curry. I used the Stampin' Up! set Vintage Vogue, too. I've been using this set a lot lately! Also, how about that Sale-A-Bration Scallop Trim Border Punch? Gorgeous. I love that it has a coordinating Scallop Trim Corner Punch!

For this card I stamped the Friends image in Melon Mambo ink and then stamped it off onto my Grid Paper. Then I took a Sponge Dauber and added some more Melon Mambo ink to the edges of the image - Rock N Roll Technique, but I used the Sponge Dauber to get into all those angles of the letter. This is mounted on a mat of Crushed Curry and then popped up on Stampin' Dimensionals to the mat of Melon Mambo. That Melon Mambo mat is punched on the outside corners with the Scallop Trim Corner Punch. I used the Scallop Trim Border Punch on a strip of Crushed Curry before I wrapped a knotted piece of Old Olive Satin Ribbon around it. This is adhered to the Old Olive mat, which is randomly stamped with the vine image from Vintage Vogue. Then I rolled a corner of the Old Olive cardstock mat and adhered it down with a Build A Brad and stamped under the corner onto the card base of Kraft cardstock.

TIP: To keep the ends of my ribbons from fraying, I always melt them with just a touch of the flame from a Lighter that I keep in my Stampin' Tools.

stampin up, card{Inside}
Recipe:
Stamps: Vintage Vogue
Cardstock: Old Olive, Kraft, Crushed Curry, Melon Mambo, Whisper White
Ink: Melon Mambo, Crushed Curry, Old Olive
Accessories: Scallop Trim Border Punch, Scallop Trim Corner Punch, Old Olive Satin Ribbon, Build A Brad, Stampin' Dimensionals, Sponge Dauber


Thursday, February 18, 2010

Holiday Mini Catalog Products Still Available

stampin up products
Following is an update from Stampin' Up! regarding the Shimmer Paints, Punches and Big Shot Dies from the Holiday Mini Catalog - be sure to save your Holiday Mini Catalog as several items are still available to order in addition to the Heart Treat Cups. The Heart Treat Cups will be a regular item in the upcoming Idea Book & Catalog.


Mini Products Still Available for Purchase

February 17, 2010
You may or may not have noticed that we've chosen to carryover several products from the Holiday Mini Catalog. This list of products (shown below) is available for purchase in OEX and Online Ordering. In addition, these products will be available in the next Idea Book & Catalog.

As usual, there may be additional products from the Holiday Mini Catalog (not currently listed as write-in products) that also may appear in your next Idea Book & Catalog.

Item # Description Price
116794 Ornament punch $15.95
116806 Champagne Mist Shimmer Paint $5.95
116854 Frost White Shimmer Paint $5.95
116807 Platinum Shimmer Paint $5.95
116829 Décor Elements Blocks $9.95
116824 Stampin' Up! Textured Impressions Folder Petals-A-Plenty $7.95
116821 Stampin' Up! Holiday Windows Magnetic Movers & Shapers $29.95
116819 Stampin' Up! Table Setting Bigz XL die $42.95
116820 Stampin' Up! Embosslits Merry die $11.95
116823 Stampin' Up! Sizzlits Merry Details die $5.50
116822 Stampin' Up! O Christmas Tree Pop-Up Bigz XL die $42.95
118140 Stampin' Up! Tree Decorations Sizzlits die $5.50
118108 My Digital Studio $79.95
116519 Charming stamp set $19.95

To order any of these items or items from the current Idea Book & Catalog or Occasions Mini Catalog, please click on the SHOP NOW button at my Stampin' Up! website at mjrindal.stampinup.net Remember that for every $50 you order, you qualify to receive a FREE Sale-A-Bration stamp set, punch or paper pack.

Tuesday, February 16, 2010

Mojo 126 - Whimsy Garden

stampin up, card, mojo mondayHere is my card inspired from the Mojo Monday Sketch 126. I used several Stampin' Up! stamp sets, including some Sale-A-Bration sets and punch. I stamped some of the sketch elements, instead of adding the actual layers, but even if I didn't follow the sketch exactly, I'm happy with the final result.

For this card, I wanted to incorporate tulips with the 30th birthday theme and so I used the big beautiufl tulip from Garden Whimsy. I stamped it a few times by inking it up with my Regal Rose and Old Olive Markers and then using a Sponge Dauber to add a little Real Red and Garden Green to the edges. I punched out a piece of Old Olive cardstock with my Wide Oval Punch and then snipped off the ends to create the vase. I stamped this with the Sanded background stamp and then sponged the edges pretty heavily. The Old Olive Satin Ribbon from the Occasions Mini Catalog was just the finish for this bouquet.

I tapped my VersaMark pad over a piece of Textured Real Red cardstock and then covered that with Iridescent Ice Embossing Powder. The Heat Gun melted that sparkling layer and then I ran it through the Big Shot with Timeless Type number dies for the 30. I also used two strips of Real Red Textured cardstock with the Scallop Trim Border Punch for the top and bottom of this card. The coordinating Scallop Trim Corner Punch is used on the Tulip panel as well. Another Sale-A-Bration set I used is A Little Birthday Cheer for the 'happy birthday' sentiment.

stampin up, card{Inside}
I have a little inside joke here for the recipient with the sparkling red pumps from Things I Love - another Sale-A-Bration stamp choice.
Recipe:
Stamps: Garden Whimsy, A Little Birthday Cheer, Things I Love, Sanded, En Francais
Cardstock: Regal Rose, Real Red, Old Olive, Whisper White
Ink: Regal Rose, Real Red, Old Olive, Garden Green, Real Red Craft, VersaMark
Accessories: Timeless Type dies, Scallop Trim Border and Corner Punches, Wide, Large and Scallop Oval Punches, Old Olive Satin Ribbon, Iridescent Ice Embossing Powder, Sponge Daubers

Monday, February 15, 2010

Fabric with your Big Shot

Big Shot, Stampin up, Fabric, QuiltThe Stampin' Up! Big Shot is not just for card making and scrapbooking - did you know that it can be one of your best tools in quilting and fabric projects, too?!

Fabric is one of the industry's hottest trends right now. There are myriad of options for seamstresses and non-seamstresses alike. While Stampin' Up! doesn't sell fabric, many of our accessories will compliment your textiles projects.

This Flower Quilt Square uses the 5-Point 3D Star Bigz die and the Scallop Circle #2 Bigz die. The precision and accuracy of repeated cuts with Big Shot dies is such a convenience when making this and other projects. Click on the Fabric Quilt Square Idea Sheet for the full instructions to create your own quilt square.

I will have some more textile projects over the next several days, showcasing the Big Shot and fabric. Be sure to check back for some Textile Inspirations!

Friday, February 12, 2010

BOLO - Stampin' Addicts Birthday Blog Hop!

stampin addicts, blog hop, birthday cardsBOLO - Be On the Look Out! Mark your calendars to celebrate the 1st Birthday of Stampin' Addicts! They are celebrating with a Birthday Blog Hop featuring birthday cards and projects with Stampin' Up! stamp sets by several talented stamping bloggers. And me! I'll be joining 24 creative stampers in showcasing birthday-themed projects February 20th and 21st. Don't miss it!

Thursday, February 11, 2010

SASC41 - Vintage Vogue

stampin up, vintage vogue, sketch challengeHere is my card for Paula's Sketch Challenge 41 at Stampin' Addicts. I used the Stampin' Up! set Vintage Vogue from the Occasions Mini Catalog and my Big Shot, too. The paper here is from the Sweet Pea Paper Stack in the Occasions Mini Catalog - a big stack of 24 sheets!

I used my 1 3/8" Square Punch to punch out 6 squares of the Sweet Pea designer series paper and arranged them on a Whisper White mat. Lining them up was easier because of my Grid Paper - love that pad; it's one of my must-have Stampin' Tools.

The stamped image is from the Vintage Vogue stamp set - I have this one in the new Clear Mount - you can try it out at Stamp Camp this week! The stamped piece was in my UFO box (unfinished objects) already matted and popped up on Stampin' Dimensionals. It was something I intended to use on a different project, but just didn't work out. So I tossed it in one of my empty stamp boxes for later. Today was the later! That made this card a super fast card to finish. Finally, I added a leaf embosslit and a couple of butterflies, too - both of these are from the Big Shot.

stampin up, sketch challenge{Inside}
Recipe:
Stamps: Vintage Vogue, Country Morning Level I Hostess
Cardstock: Close to cocoa, Whisper White, Sweet Pea DSP
Ink: Close to Cocoa, Cameo Coral
Accessories: 1 3/8" Square Punch, Leaves Embosslit, Beautiful Wings Embosslit, Stampin' Dimensionals


Wednesday, February 10, 2010

Shabby Flower Challenge

stampin up, flower card, big shotHere is my flower for Rhonda's Shabby Flower Technique Challenge at Stampin Addicts this week. I used the Big Shot from Stampin' Up! along with the sentiment from a FREE Sale-A-Bration choice stamp set, Happy Birthday and the Sweet Pea Paper Stack - an enormous pad of 24 sheets of double sided designer series paper.

I used a couple different patterns from the Sweet Pea Paper Stack and ran through my Big Shot with the Flower Folds Bigz XL Die. I crinkled up my flowers and then smoothed them out and ran my Sanding Block over them and around the edges. The center of my flower is a 1" Circle Punch of some of the same paper, treated the same way and a 5/16" Chocolate Chip Brad in the center.

The card base is a Close to Cocoa ran through the Big Shot with a Scallop Square Die, just below the fold line. I used one of the birthday sentiments from Happy Birthday, one of the 75+ Sale-A-Bration stamp sets you can choose from. For the inside, I used the flower from a Level I Hostess set, Out of the Box.

stampin up, big shot, scallop square{Inside}
Recipe:
Stamps: Happy Birthday, Out of the Box Level I Hostess
Cardstock: Close to Cocoa, Sweet Pea DSP, Whisper White, So Saffron
Ink: Close to Cocoa
Accessories: Flower Folds Die, Scallop Square Die, 1" Circle Punch, 1 1/4" Circle Punch, 5/16" Neutral Brads, Corner Rounder Punch

Related Posts with Thumbnails