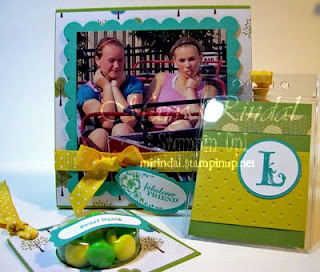
 Here's a closer look at some more of the Birthday Favors I created last weekend for the Stampin' Addicts Birthday Blog Hop and some tips to make them. Again, I used the Sweet Pea Paper Stack from the Stampin' Up! Occasions Mini Catalog for all my Birthday Favors. For this ensemble, I just used the greens and blues, instead of the oranges and pinks.
Both of these Birthday Favor sets include several items from the Sale-A-Bration Mini Catalog and the Occasions Mini Catalog. Can you list all the FREE Sale-A-Bration items from these Birthday Favors and the previous Birthday Favors?
 This party theme is based on an Amusement Park visit, so, of course, we had to have Bag Tags. These personalized Bag Tags are something the kids could stamp themselves as an activity, or you can make quickly and easily before the party. I used the plastic Badge Holders that you can find at any office supply store. I cut a piece of Old Olive cardstock to fit inside the Badge Holder and then added some layers of cardstock and pattern paper. To personalize the Bag Tags I stamped a monogram using the Lovely Letters alphabet. These are tied to the girls' bags with a piece of Ribbon.
TIP: Use the flame from a lighter to just barely melt the ends of your cut ribbon to prevent unsightly fraying, especially where the ribbon will be well used, such as on these Bag Tags.
 Recipe:
Stamps: Lovely Letters, Friends Rock,
Cardstock: Old Olive, Crushed Curry, Bermuda Bay, Whisper White, Sweet Pea DSP
Ink: Bermuda Bay
Accessories: Crushed Curry Polka Dot Ribbon, Perfect Polka Dots Texture Folder for the Big Shot, 1 1/4" Circle and 1 3/8" Circle Punches
 Another quick and easy Birthday Favor uses the Sweet Treat Cups from Stampin' Up! I just included some M&M's in matching colors. This is layered with some more paper from the Sweet Pea Paper Stack and tied off with ribbon. The sentiment is from Teeny Tiny Wishes and is adhered to the Treat Cup with Mini Glue Dots.
TIP: Don't forget the 1 3/4" Circle Punch to create the mats for the Sweet Treat Cups. I just cut a little 'X' on the back of this Sweet Treat with my Hobby Blade so that it was easy for the kids to get their candies out.
Recipe:
Stamps: Teeny Tiny Wishes
Cardstock: Old Olive, Bermuda Bay, Whisper White, Sweet Pea DSP
Ink: Bermuda Bay
Accessories: Sweet Treat Cups, 1 3/4" Circle Punch, Crushed Curry Polka Dot Ribbon, Word Window Punch, Modern Label Punch
 This Photo Frame is really quick and easy to make, too (seeing a theme here?!) I used a piece of 5"x12" Old Olive cardstock, scored at 1", 6" and 11". Fold on all the score lines and adhere the bottom and top tabs to a 2"x5" piece of Old Olive cardstock to give the photo frame a wide base. I added a mat of Sweet Pea DSP. The Bermuda Bay photo mat is run through the Big Shot with the Scallop Square Die and adhered with Stampin' Dimensionals. The mat accommodates a 4x4 photo, so you can easily crop a 4x6 photo down to fit the Photo Frame and send home with the party goers.
Recipe:
Stamps: Oval All
Cardstock: Old Olive, Bermuda Bay, Whisper White, Sweet Pea DSP
Ink: Bermuda Bay, Crushed Curry marker
Accessories: Crushed Curry Polka Dot Ribbon, Scallop Square Die for the Big Shot, Large Oval and Scallop Oval Punches, Stampin' Dimensionals, Mini Glue Dots
TIP: If you're struggling with the ribbon bow, just wrap a piece of ribbon around your project and adhere it down. Then take a piece of ribbon and create two 'bunny ears', one in each hand. Tie these bunny ears around each other once to create a bow. Fluff the bow and arrange the center knot as needed. Attach to your ribbon wrap with a Mini Glue Dot.


No comments:
Post a Comment