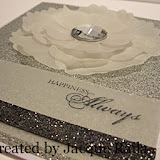
 Last week during the Stampin' Addicts Winter Blog Hop, I shared this Valentine Burnished Glitter card using the Silver Ultra Fine Glitter, part of the two pack of Gold/Silver Ultra Fine Glitter in the Stampin' Up! Holiday Catalog. This is a beautiful technique with such unique results and I wanted to share a few photos on creating this background. Warning, it's quite a messy glitter technique! I know Glitter is always somewhat messy, but Burnished Glitter is spectacularly so! You'll need two products to create this background, Adhesive Sheets and Ultra Fine Glitter.
 First, use the Multi-purpose Adhesive Sheets from Stampin' Up! with one of our many Big Shot dies to get a variety of shapes for your card. Some of the dies that work well with this technique include the Autumn Accents, the Hearts Framelits, the Bigz Butterfly die and the Beautiful Wings Embosslit or some of the Snowflake dies or any of the Flower dies as well. Here, you can see that I am using the Autumn Accents Bigz Die.
  When you get your Adhesive Sheet die cut into several shapes, lay them out on your card front to get an even layout. Then, carefully, peel off one of the backings of the Adhesive Sheet dies and stick them to the cardstock. Try not to touch any of the adhesive, it's a very light weight adhesive and will pull off onto your fingers, and that will diminish the shape of your glittered pieces.
  Then peel off the remaining backing of the Adhesive Sheets and cover the cardstock with Glitter. This technqiue works with the Stampin' Up! Ultra Fine Glitter, but will not work with a heavier grain glitter, such as our Glass Glitter. Completely cover the sticky die shapes and then tap off the excess glitter.
 Now you will have a beautiful and very glittery background piece. The next step is the Burnishing. Firmly rub the glitter in small circular movements, all over the
adhesive piece. You can use your fingertip, but I prefer to use an eraser tip to do this work. You will immediately see the change in the glitter to the smooth satin glitter finish. Continue burnishing the glitter in
small circular motions until you have rubbed out all the rough spots.
You'll have quite a bit of loose glitter. Just tap it off onto
your scratch paper.
 When you're finished burnishing,
wipe your glittered cardstock with a Swisher dusting cloth to
remove all the stray pieces of glitter. This picture shows the finished Burnished Glitter background piece. I used Gold Glitter with the Autumn Accents die cut on a Basic Black cardstock piece. This is a very dramatic look and I just love the finished card.
Recipe:
Stamps: Chalk Talk
Ink: Gold Encore
Cardstock: Gold Metallic, Basic Black
Accessories: Gold Ultra Fine Glitter, Multi-Purpose Adhesive Sheets, Gold Embossing Powder, Autumn Accents Bigz Die, 1 1/4 and 1 3/8 Circle Punches, Baked Brown Suger Ruffled Trim


My Stampin' Events
Current Stampin' Up! Promotions
Mary Rindal is an Independent Stampin' Up! Demonstrator in Greenwood Village, Colorado.


No comments:
Post a Comment